Friday, May 15, 2015

#250 - Why do I blog?

"Your voice is as important as anyone else’s." ~ J.J. Abrams

Why do I blog? I started this blog in September 2010, without any idea of what I was doing or where I thought it would go, other than I wanted to start writing about my new hobby, photography.  I wrote a few things over the next couple of years (most of which has since been deleted, they were so poorly written and unfocused), then I started to blog consistently in August 2012, mostly posting a single photo with a short description. Eventually it evolved again into what it is today - longer posts with multiple photos and the "story" behind them.

Why do I blog?  It's a creative outlet.  There was a time when I wanted to be writer.  I studied writing, read constantly, filled journal after journal, wrote short stories and sent them off to publishers, and filed away the rejection letters as they came in - if they came at all.  I plugged away, then "life" happened.  I still wrote, off and on, then, in my early thirties, I finally went back to college and took it seriously.  Writing became a necessity, essays and term papers.  Shortly after college I switched careers and dove into the world of grant writing for a nonprofit, the stakes got higher, and the joy of writing subsided - it was now a j-o-b.  I stopped writing for pleasure.  Now, a couple of years removed from the grant writing world, I've slowly started to enjoy writing again. 

Why do I blog?  It's a means to document my journey.  The small steps and big leaps.  I look back at photos I took a couple of years ago, a year ago, a month ago, and I see improvement.  And I see room for improvement.  The better I get, the further I feel I need to go.     

Why do I blog?  To share a new technique I've learned.  This is one of the first photos I developed in the "digital darkroom" using the High Dynamic Range (HDR) technique.
 
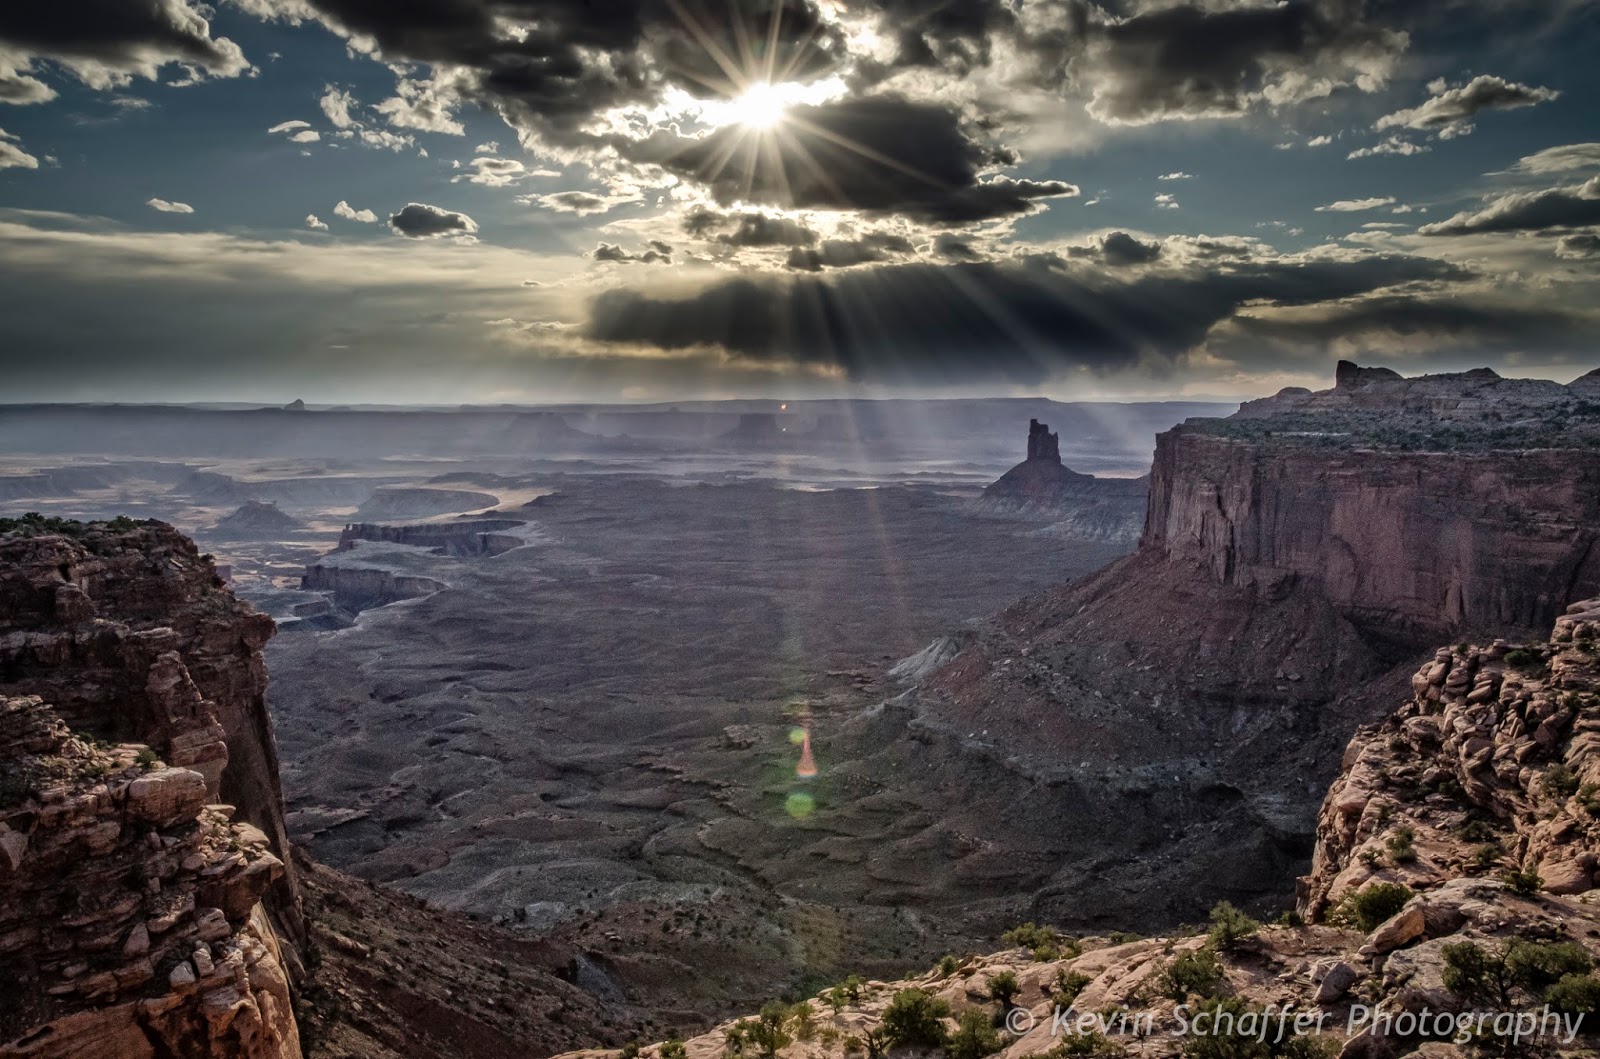
Why do I blog?  To show off what I can do with a new toy.  This photo was taken with my fisheye lens, which enabled me to get the sunburst with the well defined rays.

Why do I blog?  To share a new direction my photography has taken, in this case urban exploration (Urbex) photography.

Why do I blog?  To share those moments rooted in serendipity.

Why do I blog?  To share the little things that catch my eye.

Why do I blog?  To share kitschy, quirky, pieces of roadside Americana I ran across.

Why do I blog?  To share a sunrise.
 
Why do I blog?  I’m a quiet person by nature.  Sharing my photography has given me a way to express myself and share things that catch my eye and pique my imagination.  I look forward to continuing to search, explore, and discover the wonders of the Southwest and wherever else my muse may take me, and continuing to share those experiences.

That's why I blog.

All photos taken with a Nikon D7000 camera body, and Nikkor lens

You can view my online portfolio and purchase prints here.

Want to keep up to date with where I'll be and what my latest creations are?
Follow me on FaceBook and Google+
I'm also on Twitter @KSchafferPhoto
And now on Instagram: @kschafferphoto


Saturday, May 9, 2015

The Real and the Imagined

Last weekend we drove down to Socorro, New Mexico, a short overnight trip to explore the area.  The idea was to catch sunset at the Very Large Array, sunrise at the Bosque del Apache National Wildlife Refuge, and to track down a few green chile cheeseburgers.  We managed to do all this, but it was an unexpected stop that - as often happens on a venture like this - was the highlight of the weekend for me.

Saturday morning, after leaving Bosque del Apache, we decided to follow the signs to the El Camino Real International Heritage Center (which is now called the El Camino Real Historic Trail Site). After a short drive we arrived, walked in, glanced around, and decided to stay and check out the Visitor's Center and Museum.  In short, I can say that this is definitely worth a stop, as you can learn a lot about the El Camino Real and the settling of New Mexico by the Spanish and other emigrants during the 1600-1800s (you can find details about the Center here).
 
After going through the museum we went out on the observation deck, and almost immediately I decided to go back to the truck and grab my camera. 

What first caught my eye was the reflection of the clouds in the building's windows and how the blue tinted glass almost mirrored the feel of the blue sky...
 

There were cold blue steel girders and the patterns of those beams and wires against the backdrop of the cool blue sky and wispy clouds...

I looked up and saw a steel beam bisecting the sky...
 
Then there was this structure, jutting out from the ground like a concrete slab of progress fighting to gain a foothold in the barren desert landscape...

Walking back out to the parking lot, out the front walkway, I looked up and saw these converging lines, leading the eye out to the wide open, vast nothingness of the desert plain...

And looking back down the walkway I was taken in by the repetition of pattern, both in the construction of the building and the shadows that cut across the wall and the walk, the texture of the concrete blocks, and how this man-made structure served as a window to the still open, mostly undeveloped country...

Once I started thinking about it, everywhere I looked all I could see was the juxtaposition of this modern concrete and cold blue steel building against a land that, in any given direction, looked much the same as when the first Conquistadors crossed the rolling hills and open plains dotted with juniper and cactus, scrub brush and sage...

Footnote:  As I started to write this I jotted down an outline of thoughts that I had bouncing around in my head, then I hit the Internet to do a little background research.  I soon found the "Friends Of El Camino Real" website, and learned the following: "The wagon caravans, traveling the trail over the flat desert expanse of the Jornada del Muerto, were often described as looking like ships on the ocean. The Visitor's Center building was designed to be that ship that takes the visitor along El Camino Real. The entrance is the gangway to the ship; the building interior to appear somewhat like a cruise ship, entering along the promenade deck to a stairway to the main deck. Outside the building, to the east, is the ampitheater, overlooking the vast Jornada del Muerto, as if standing on the bow of a ship, complete with a bow mast and observation deck."  After learning this I thought about revising what I had written to that point, but decided to go with what my initial impressions were, knowing that I now had two frames of reference for the experience - the real and the imagined.

All photos taken with a Nikon D7000 camera body, and Nikkor 16-85 DX VR lens

You can view my online portfolio and purchase prints here.

Want to keep up to date with where I'll be and what my latest creations are?
Follow me on FaceBook and Google+
I'm also on Twitter @KSchafferPhoto
And now on Instagram: @kschafferphoto
      

Thursday, April 30, 2015

Canyonlands Sunset

Last month we went to Moab, Utah, to spend time in the area - and do some shooting, of course.  One objective I had for the trip was a sunset shoot at Canyonlands National Park.  During a previous trip to the park last October, I spent an evening shooting sunset at the Green River Overlook, but between the lack of clouds in the sky and abundance of people on the ground, the experience came up a little short.  This time I wanted to try a different spot.

During that last trip to Canyonlands I had pulled over at the Candlestick Tower Overlook, which is on the way out to the Grand View Point Overlook in the Island In The Sky section of the park, and spent a few minutes looking around and taking a few shots.  I thought this spot had potential for a sunset shoot and tucked that thought away in the back of my mind. When we headed out this time I had my sights set on two spots - Candlestick Tower Overlook and Holeman Spring Canyon Overlook, which is on the spur road to Upheaval Dome.  After taking a look at both spots that afternoon the decision was made - Candlestick Tower Overlook.

I had decided to use one lens for this shoot - my Nikon 16-85 DX VR.  This would give me a good working range, and I was hesitant to change lenses during the shoot given that there would be a breeze and most likely dusty condition.  After we pulled over in the parking area, I grabbed my camera and tripod and worked my way down to the canyon rim.  Sunset was at 7:39 P.M. that night, and by 6:30 P.M. I was in position.  Now it was just time to hang out and see what would transpire.

Before long a bank of clouds started to move across the sun, casting shafts of light towards the canyon below.  I stayed with a wider angle for this shot, so I could get the canyon walls in the foreground and Soda Springs Basin - to the left of Candlestick Tower - in the shot also. 6:35 P.M.

Soon the clouds almost completely covered the sun, and the God rays (crepuscular rays) became the predominant feature of the scene before me.  I zoomed in on Candlestick Tower and tried to emphasize those aspects.  6:37 P.M.

For this shot I zoomed back out a bit to show the golden light on the canyon floor as well as the sun's rays.  Later, when working on the shot in the digital darkroom, I cropped it to a landscape ratio to give the scene a more "sweeping" look.  6:42  P.M.

Then it became a waiting game, taking a few shots now and then, watching the sun slowly descend in the sky.  A few minutes before sunset, as the sun started to touch the horizon, the sky started to glow.  7:30 P.M.

After the sun sank below the horizon the sky turned orange, so I zoomed back in to try and capture that beauty.  7:44 P.M.

This time everything fell into place...

All photos (except camera setup) taken with a Nikon D7000 camera body, and Nikkor 16-85 DX VR lens

You can view my online portfolio and purchase prints here.

Want to keep up to date with where I'll be and what my latest creations are?
Follow me on FaceBook and Google+
I'm also on Twitter @KSchafferPhoto
And now on Instagram: @kschafferphoto


Friday, April 24, 2015

Morning At Broken Arch

About a month ago my wife and I went to Moab, Utah, during her spring break, to check out the two National Parks in the area - Arches and Canyonlands - as well as Dead Horse Point State Park (which I wrote about here) and various other points of interest in the area.  While we were there we took a sunrise hike to Broken Arch in Arches National Park. 

There are arches and destinations in Arches that are more spectacular, or iconic, but a sunrise hike to Broken Arch is probably my favorite.  The trail is easy, about 1.2 miles round trip, following a sandy trail that goes from the parking lot across a large meadow to the arch.  Walking into the sunrise, you can feel the morning sun on your face and watch the shadows forming across the landscape as the sun breaks the horizon.  Dawn that morning was at 6:37, with sunrise at 7:04.  We were on the trail as the sun rose, just in time to watch the subtle differences in light and gesture as Broken Arch met the morning...

I had my wide angle lens (Nikon 10-24 DX) on my camera as we hit the trail, knowing from past experience that I would need a wider angle to frame the arch in its entirety, and that I may be able to incorporate a sunburst in a few shots.  We got to Broken Arch shortly after sunrise, and after I walked around to the east facing side of the arch I took this shot.  7:16 A.M.
 
I then turned towards the arch and scrambled up the rocks to get this shot...  7:18 A.M.

As the sun started to warm the arch I moved closer, framing shots until I found a composition I liked...  7:20 A.M.

I then climbed back down and walked around to the west side of the arch, and started taking tight shots of the arch as the sun began to shine through...  7:31 A.M.

I waited another couple of minutes until the sun hit the rim...  7:33 A.M.
 
Then I switched to my fisheye lens.  This lens lends a little more curvature to the scene, and also produces a "tighter" sunburst, with more defined rays.  This was taken at 7:38 A.M.  
  
Broken Arch is definitely worth the effort of getting out of bed to catch sunrise.  The next time I'm in Moab, I'll be sure to make the trek again...

All photos taken with a Nikon D7000 camera body, and Nikkor 10-24 DX (wide angle) and Nikkor 10.5 DX (Fisheye) lenses

You can view my online portfolio and purchase prints here.

Want to keep up to date with where I'll be and what my latest creations are?
Follow me on FaceBook and Google+
I'm also on Twitter @KSchafferPhoto
And now on Instagram: @kschafferphoto


Tuesday, April 7, 2015

Catching Sunrise at Dead Horse Point

“Your landscape pictures shouldn’t say ‘I was here,’ they need to say ‘you need to be here.’” ~ Moose Peterson

Last week the wife and I spent Spring Break in Moab, Utah, one of my favorite places to explore and photograph, jumping point to Arches National Park, Canyonlands National Park, and several smaller yet also noteworthy areas.  While in Moab one of things I wanted to do was catch sunrise at Dead Horse Point State Park, an area I hadn't visited yet.  The park is known for a dramatic overlook of Canyonlands National Park and a section of the Colorado River known as the Gooseneck.  I knew the time had come to see this in person.

We made the decision to head out to Dead Horse Point on the morning of March 31.  Dawn that morning was 6:40AM, with sunrise at 7:06 AM (I'd like to take a moment and recommend SunCalc - located at www.suncalc.net - a free desktop app that shows sun movement and sunlight phases during any given day at any given location, with the ability to go back in time and look up sunrise/sunset times, which is a handy feature for people like me who don't always take the best notes).  Knowing that the drive to the park from Moab would take about 45 minutes, and that I would want to be into position early to get the best spot to shot that morning, necessitated a 4:15 AM wake-up.  Thankfully my wife is a light sleeper and early riser, so all I had to do was get up - knowing I could leave the driving to her...

We arrived at the destination around 6, and after a brief wait walked out to the overlook, took a look around, picked a spot, hopped over a wall, and got into position on a ledge overlooking the river at around 6:25 AM.  I set up my tripod and mounted a 16-85mm mid-range zoom to my camera, so I would have a good range of focal lengths to work with...   
 
With sunrise coming at 7:06 AM, now it was time to wait and watch the light.  At 6:45 AM. I took a few shots of the cool, dawn, pre-sunrise light.  When post-processing the shot later I used a Tilt Shift effect to give it a both a "miniature" look, and to help pull the viewer in... 

A few minutes later the sun rose, then at 7:17 AM the sun started to hit the top of the ridge on the canyon's far side, opposite the sunrise.  There were few clouds in the sky, but the light playing off the canyon walls was more than enough to get my full attention...

7:20 AM.  As the sun rose higher in the morning sky, the light started working its way down the canyon walls and hit the ridge on the piece of land circumvented by the Gooseneck section of the Colorado River...

7:25 AM...  At this point I switched to my wide angle (10-24mm) lens.  The canyon lands were bathed in light now, with a strong reflection of the landforms in the Colorado River, and I wanted to use a wider angle of view to show as much of the light playing off the land as I could...

7:40 AM.  The sun had risen high enough in the sky by this point that the light was starting to even out a bit, and although it was still a spectacular sight, the best shots of the morning had been taken.  After breaking down my tripod and hopping back over the wall to the foot paths, I still had one more shot I wanted to get.  On the way in I had seen this juniper tree, and I wanted to get a couple of shots with the morning light kissing it.  Still using my wide angle lens, I zoomed all the way out to 10mm and walked up as close to the tree as I could while still capturing the sky behind it.  I was probably two feet from the tree when I took this shot...

Dead Horse Point.  What is there to say other than I want to go back, to catch another sunrise, to catch a sunset, to marvel once again...

All photos taken with a Nikon D7000, and Nikkor 16-85 DX VR and 10-24 DX lenses.  Camera support provided by a Manfrotto 190XPROB Pro Aluminum Tripod with Manfrotto 496RC2 Compact Ball Head.

View my online portfolio here
       

Tuesday, March 24, 2015

Get Appy

“Photography is the power of observation, not the application of technology.” ~ Ken Rockwell 

Or, it can be the power of observation coupled with the application of (new to you) technology.  Looking for ways to expand the reach of my brand and give a "here's what I'm up to right now" look at my work - albeit a little late to the party - I started posting to Twitter (@KSchafferPhoto) last October, and a couple of weeks ago I started an Instagram (@kschafferphoto).  Using my phone to take photos on the road and post them to social media has given me a different eye with which to see the world around me and given me a different set of tools to further enhance that vision.  As I've spent more time using my phone (an iPhone 5) as a creative tool, I've accumulated and experimented with a few photo apps, which I'll discuss before moving on to some examples.

Here's a breakdown of the photo apps I have on my phone, in alphabetical order, and a quick thought about each:

Aviary (free) - I use this app when I want to add text to a photograph - like a watermark - or need a "one click" solution for a landscape photo that isn't too "over the top."  For example, using the Enhance > Scenery filter adds some contrast, exposure, and saturation adjustments to a photo that I can then quickly post.
Camera+ (free) - I've had this app for a couple of months and use it when I want a "one click" solution that gives a "faux HDR" look.  Using the "Clarity" filter gives me that quick solution that produces a photo with saturated colors and some "pop."
Priime (free) - This is the newest of the apps, only released last week.  I haven't done much with it yet, but here's an article that discusses it in some detail.
Snapseed (free) - This is the app I use when I have time to experiment with making several adjustments.  Starting with the Drama or HDR Scape filters then making finer adjustments is usually the route I take with this app.
SlowShutter ($.99) - This is another recent addition.  I've taken a few shots with it to get a feel for how it works, but don't have an example that's worth sharing at this time.  As the name of the app implies, it allows you to use slower shutter speeds with your phone's camera.
VSCOcam (free) - Another recent addition that I'm only beginning to explore.  VSCO produces plugins for programs like Photoshop that emulate the look of film, and this app does the same thing, with the ability to further edit the photo once taken.  One of the photographers I respect the most, David duChemin, uses this app (and SlowShutter) extensively and creates some beautiful work, and I'm looking forward to carving out the time to get more familiar with it.
vividHDR ($1.99) - I've only had this app for a couple of weeks, but it's quickly become my favorite.  One click, pick a style, and then do some editing in the app and you're ready to post.  This is already my go to app for black and white photography. 

This past week I took a short road trip to Amarillo, Texas, to see what there was to be seen.  The first stop I made was Cadillac Ranch, just outside of Amarillo, a piece of Americana that I've wanted to see for quite some time.  I don't know why, but I have a fascination with the quirky roadside attractions that dot the landscape of the America.  This photo was taken using the Camera+ app, then applying the "Clarity" filter.

Next stop was Palo Duro Canyon State Park, about 30 miles from Amarillo.  It was an overcast day, the sun peeking out occasionally, as I drove through the park.  This shot was taken using the Snapseed app, then applying the HDR Scape filter before doing some final in app editing.
 
Further in Palo Duro Canyon State Park I saw this gorgeous scene, pulled my car over, and walked up the hill a bit to get a better vantage point.  This shot was taken with the vividHDR app.  I then applied the Dramatic filter and made a few adjustments. 

The next morning I woke to an overcast, foggy day, and I headed back to the canyon hoping that the skies would clear up as the day wore on.  This didn't happen, so after exploring the park a bit I headed back out and drove around exploring the Texas Panhandle.  At one point I saw this lone tree with the two toned background and spent quite a bit of time photographing it, both with my phone and my DSLR.  This shot was taken using the vividHDR app, applying the Lively filter, then making a couple of quick adjustments.

On the third day I headed back to Santa Fe, but not before stopping at Cadillac Ranch early in the morning.  Again, I spent quite a bit of time photographing the scene with both my phone and camera.  This shot was taken with Snapseed, and then applying the HDR Scape filter and making a few adjustments.

On the way back home to Santa Fe, I made a point of stopping by the (near) ghost town of Cuervo, New Mexico.  This shot was taken with vividHDR, then applying the Gray Art filter before making some minor adjustments.
  
Using my phone as a vehicle for capturing scenes and doing some mobile editing has given me a new way of approaching photography and looking at the world - and given me a chance to share that in real time...  

View my online portfolio here
Follow me on Twitter: @KSchafferPhoto
Follow me on Instagram: @kschafferphoto


Saturday, March 7, 2015

Rio Grande Arts & Crafts Festival Spring Show

I will be showing a selection of my work at the Rio Grande Arts & Crafts Festival's 27th Annual Spring Show in Albuquerque, New Mexico, March 13-15.  The show will be held in the Lujan Exhibit Complex at the Expo NM Fairgrounds.  This is an indoor show, so I'll be there rain or shine!  You can find more details about the show here.

I will be premiering several new pieces at this show and will have a few items available - matted prints and greeting cards - for the first time.   

"Dune At Dusk" will be available in two formats: a 20" x 30" stretched giclée canvas print mounted on a wood frame, ready to hang, for $150, or my latest offering, a 10.8" x 14.4" glass print (the image is printed directly onto a glass plate), ready to hang, for $125.

"Tumacácori" will be available as a 12" x 16stretched giclée canvas print mounted on a wood frame, ready to hang, for $65.

"Memories In Sepia" will be available as a 14" x 14" stretched giclée canvas print mounted on a wood frame, ready to hang, for $65.

"Twisted Into Form" will be available as an 16" x 16" Infused Aluminum Print, ready to hang, for $125.

I will also have 8" x 12" prints matted to fit a "16 x 20" frame.  These photos are printed on Kodak Endura or Fuijifilm Crystal Archive paper, mounted in a high-quality, acid-free matte and housed in a protective clear plastic sleeve, so you can safely store your print until you find the perfect frame.  These matted prints will be $35 each, or 3 for $90. 

Finally, I will have available for purchase 5" x 7" greeting cards (with envelope).  Each card depicts a scene from southwest, like the example below, the San Ysidro Catholic Church in the Village of San Ysidro, New Mexico.  These cards will be $3.50 each, or 3 for $10.

I'm looking forward to this, my first show, and hope to see you there!

You can view my online gallery and order prints here

Want to keep up to date with where I'll be and what my latest creations are?
Follow me on FaceBook and Google+
I'm also on Twitter @KSchafferPhoto